11 DIY Gardening Projects for Older Gardeners

DIY gardening projects

Gardening isn’t just for the young – it’s a fun activity that can work for everyone, regardless of age. For those of us who’ve seen a few more seasons, bending down to tend to our floral friends might not be as easy as it used to be. Fear not! We’ve dug up 11 gardening projects that keep the fun alive without requiring a visit to the chiropractor afterward.

1. Raised Bed Bonanza

1. Raised Bed BonanzaElevate your gardening game, quite literally, with raised beds. They’ll massively save your back from the dreaded bend, and they’ll also put a stop to those pesky critters who think your veggies are their personal buffet. Think of it like building a fortress to keep out invaders, but for your tomatoes and zucchinis.

2. Potting Bench Magic

2. Potting Bench MagicImagine a world where all your gardening tools live in harmony in one spot. Enter the potting bench! It can be a place to pot plants, store your gear, and even display some of your botanical beauties. Potting benches are like organization mixed with functionality in the best possible way. Plus, it’s pretty cheap!

3. Container Garden Wonderland

3. Container Garden WonderlandWho said you need a sprawling garden to have a green thumb? Container gardens bring the joy of planting to any space, be it a patio or a windowsill. Mix and match pots of different sizes and colors for a vibrant display. Bonus points for using recycled containers to give them a second life!

4. Fairy Garden Fantasy

4. Fairy Garden FantasyUnleash your inner child with a fairy garden. These miniature landscapes are perfect for adding a touch of whimsy to your garden or balcony. Put in some tiny houses, furniture, and even miniature plants to make them come alive. Plus, you can change the scenes as seasons change, hosting tiny garden parties, or creating fairy snowscapes!

5. Herb Spiral Splendor

5. Herb Spiral SplendorCreate a spiral herb garden for a striking and space-saving way to grow your favorite seasonings. It’s a feast for the eyes and the palate! Fresh basil, thyme, and rosemary at your fingertips without having to go too far. And when the smell hits you, it’s like receiving a lovely scented letter from Mother Nature herself, inviting you to cook up a storm.

6. Water Features Wonders

6. Water Features WondersThe soothing sound of water can transform any garden into a serene oasis, and installing a small fountain or birdbath doesn’t require a degree in landscape architecture. It’ll add a focal point for a little peace and maybe a few bird friends. Think of it as creating a spa day for your feathered friends and a zen moment for yourself every time you step outside.

7. Sensory Garden Sensation

7. Sensory Garden SensationEngage all your senses with a sensory garden by planting fragrant flowers and textured leaves. It’s a garden that looks, feels, and even sounds good amazing, with the rustle of leaves and the buzz of bees. Every visit feels like a new discovery, where plants like lavender soothe your soul, and the crinkle of leaves will take you on a nostalgic trip down memory lane.

8. Vertical Garden Victory

8. Vertical Garden VictoryOnly got a little garden space? Don’t worry! Trellises, wall planters, and hanging baskets allow you to grow upwards. It’s a fantastic way to make the most of limited areas and can turn a bland wall into a lush tapestry of green. This sky-high garden is also a living art piece, proving that the sky’s the limit when it comes to green thumbs.

9. Pollinator Paradise

9. Pollinator ParadiseBees and butterflies play an important in our ecosystem. Plant a selection of nectar-rich flowers to create a pollinator-friendly garden. You’re throwing a party for the natural world, and you’ll get front-row seats to nature’s most beautiful ballet, all while playing a key role in supporting local wildlife.

10. Rock Garden Rhapsody

10. Rock Garden RhapsodyLow-maintenance rock gardens are perfect for adding texture and depth to your outdoor space. Choose drought-resistant plants for a garden that thrives with minimal fuss to create a rock concert, minus the noise. This rockin’ garden is a tribute to resilience, proving that beauty can bloom even in the toughest conditions.

11. DIY Garden Decor Delights

11. DIY Garden Decor DelightsPersonalize your garden with DIY decor. From painted rocks to upcycled garden furniture, the possibilities are endless. You can add a touch of personality to your space to make it uniquely yours. Every handmade touch adds a story and soul to your sanctuary, meaning that no two gardens are ever the same.

The Truth

The TruthGardening doesn’t have to be a back-breaking endeavor, nor does it require huge expanses of land. With these 11 DIY projects, anyone can cultivate their passion for planting to create beautiful spaces that are also brimming with personality and ease of access. So, roll up those sleeves and let the dirt-digging, plant-planting fun begin!

Using Shredded Paper As Garden Mulch

Garden For Free


10 Home Improvement Projects to Increase Your Home’s Value

Home Improvement Projects

Let’s talk about jazzing up your homestead – you know, giving your pad a bit of a facelift without breaking the bank or, heaven forbid, your back. After all, your home isn’t just a place to hang your hat. It’s your kingdom and probably the biggest investment you’ll ever make. So, let’s explore some upgrades that promise to pump up your home’s value faster than you can say “equity.”

1. Paint the Town (or Just Your Living Room)

1. Paint the Town (or Just Your Living Room)Nothing screams ‘new’ like a fresh coat of paint. Ditch the boring shades for something that brightens the room and your mood. Think of it as a facelift for your walls – less about hiding wrinkles and more about highlighting character. Plus, it’s the most bang for your buck to make potential buyers think, “This is the one!”

2. Kitchen Quick Fixes

2. Kitchen Quick FixesYou don’t need a TV chef’s kitchen, but a mini-makeover can work wonders. Swap out those dated cabinet knobs for chic, modern handles. Upgrade that ancient faucet to a sleek, new model. Throw in a backsplash that pops for an instant visual upgrade. Suddenly, your kitchen is not just functional but a statement piece!

3. Bathroom Blitz

3. Bathroom BlitzHere’s a spot where you can truly clean up – figuratively and literally. Replacing old fixtures and adding some modern lighting can turn a “blah” bathroom into a spa-like retreat. Consider a low-flow toilet for a touch of green and a high-impact showerhead for that daily dose of luxury. It’s all about creating a vibe that makes you forget about the day’s troubles or at least makes them seem less troubling.

4. Create Curb Appeal

4. Create Curb AppealFirst impressions are everything. Trim the hedges, mow the lawn, and maybe even add some colorful flowers to say, “Welcome, we’ve been expecting you.” Paint your front door a bold color to make it pop against a neutral facade. It’s like dressing up for a first date with your house – you want to look your best.

5. Deck It Out

5. Deck It OutAdding a deck or sprucing up the one you have will help your home feel more put-together. Incorporate built-in seating and planters for a custom look that tells people, “This is the spot for summer evenings.” It’ll increase your home’s resale value – and who doesn’t love a good BBQ? Suddenly, everyone wants a backyard like yours!

6. Energy Efficiency

6. Energy EfficiencyYes, upgrading to energy-efficient windows or a smart thermostat is good for the planet, but it’s also great for your wallet. Insulating your attic and sealing drafts are other great moves for energy savings. Think of it as your home going on a diet and shedding those extra utility bill pounds. You’ll feel like a green superhero, saving the world one kilowatt-hour at a time!

7. Floor Them With New Flooring

7. Floor Them With New FlooringRipped carpet or scratched-up hardwood floors are a no-go. Upgrading to durable, sleek flooring can completely transform a room. Whether you choose the warmth of engineered wood or the cool chic of tile, it sets the stage for the entire home. You’re essentially giving your home a new foundation to stand on – both literally and figuratively.

8. Light It Up

8. Light It UpGood lighting can make a big difference in how your home feels. Swap outdated fixtures for something that reflects your style. Add dimmer switches to control the ambiance from breakfast to bedtime. Your home becomes a stage, and you’re the director, setting the scene for every moment.

9. Smart Home Gadgets

9. Smart Home GadgetsFrom smart locks to programmable thermostats, technology can make life easier and your home more appealing to tech-savvy buyers. Throw in a voice-controlled assistant, and you’ve got yourself a home that not only listens but also responds. It’s a modern convenience that’s quickly becoming a necessity, making your home both smarter and more secure.

10. Landscaping

10. LandscapingDon’t underestimate the power of a well-manicured lawn and some strategically placed plants. Adding outdoor lighting can turn your garden paths into a magical nighttime scene. You could even use a small water feature to introduce a soothing backdrop sound and improve the peacefulness of it all. Every step home will feel like a royal welcome!

Wrapping It Up

Wrapping It UpIf you’re creative and put in the effort, you can significantly boost your home’s value and appeal. Whether you’re looking to sell or just want to enjoy your nest a little more, these improvements are sure to add that extra zest to your living space. The goal is to make your home not just a place to live but a place to thrive.

10 Smart Estate Planning Steps to Take Before Retirement

How To Get Free Seeds From the Government


Inexpensive Alternatives To Grow Lights

(X) Inexpensive Alternatives To Grow Lights

Grow lights can be a really helpful tool for indoor gardening. Many people find that they are worth their cost. However, they aren’t cheap. Therefore, you might want to consider some of these inexpensive alternatives to grow lights.

What Are Grow Lights?

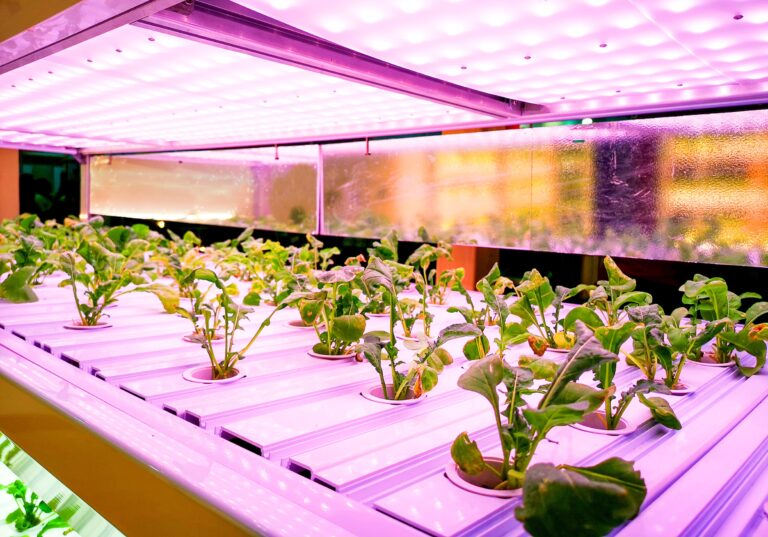
Grow lights are exactly what their name says: lights designed to help plants grow better. As you might guess, these aren’t just any regular light, though. You can’t just turn a desk lamp on to your plants and assume that they’ll grow better as a result. Instead, plants need light that’s similar to sunlight. Grow lights use particular colors from the light spectrum to help your indoor plants grow.

Inexpensive Alternatives To Grow Lights

There are several good inexpensive alternatives to grow lights. However, it’s important that when you look at these cheaper alternatives, you make sure that you’re choosing the right ones for your plants. There are different types of grow lights, with different intensity and energy efficiency, etc. Do your research to find out what works best with your particular setup.

1. Fluorescent Lights

Hydroponic Way suggests using fluorescent lighting as one of the best inexpensive alternatives to grow lights. They note that they generally don’t emit a lot of heat, which is important. A light bulb that burns too hot can burn your plants, doing the exact opposite of helping them to grow! However, because they don’t burn too hot, they also don’t burn too bright. As a result, they don’t produce enough light for some plants to grow well. Do your research to find plants that will grow well under fluorescent lighting.

2. LED Grow Lights

There are actually many different types of grow lights on the market. Some are more expensive than others. If you want to purchase grow lights made for your indoor garden but don’t want to spend a lot of money, then consider purchasing LED grow lights. They’re easy to find. Moreover, they’re energy-efficient so they won’t run up the cost of your home electric bill.

3. Halogen Lights

Hydroponic Way notes that these are not the most efficient option. However, if you already have halogen lights or you can get them affordably, then you might want to see if they work well for your indoor garden.

4. Incandescent Light Bulbs

Today’s Homeowner notes that you can use incandescent lighting bulbs as grow lights. However, as aforementioned, they burn hot so they have the potential to burn your plants. As a result, make sure that you keep the lights further away from the plants than you would with the other types of alternative lights. They note that a nice option is to combine incandescent lights with fluorescent lights because each emits a different type of light on the spectrum, giving your plants a better balance for good growth.

5. Sunlight

Obviously, the sun is the best light source for your plants. If you can skip the grow lights and use nature, then that’s your best option. It’s free, after all. Of course, you might not have the choice to grow all of your plants outdoors. Or you might want to enjoy indoor gardening during months when it’s too cold for plants outside. If you can set plants up near windows that get the right amount of sun, this is still your best option.

Read More:


5 Cheap Substitutes for Seedling Trays

Substitutes for Seedling Trays

Seed trays offer a great way to start off your planting season. However, you don’t need to purchase actual trays from the gardening supply store. Instead, you can upcycle/recycle/DIY many terrific substitutes for seedling trays. Here are five good ideas:

What Are Seedling Trays?

Seed trays provide a great opportunity to begin growing multiple plants from seed at once. You germinate a bunch of them together in the trays. Then, when they’re ready to go into pots or the ground, you transplant them. This allows you to start your planting season early, beginning plant growing inside until it’s warm enough for outdoor planting.

Cheap Substitutes for Seedling Trays

You can easily purchase seedling trays. There are many different varieties, made of different materials, and in the come in a huge range of sizes. However, there’s really no need to purchase these when it’s so easy to make substitutes for seedling trays yourself.

1. Egg Cartons

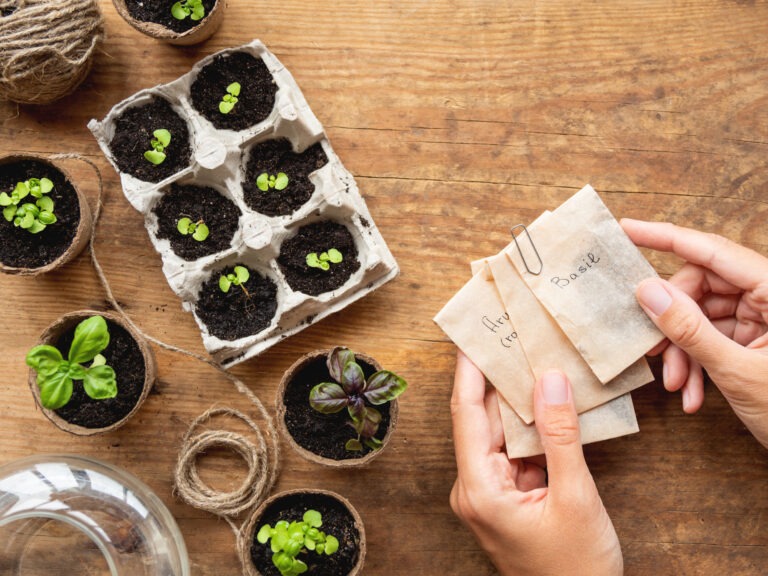
Egg cartons provide one of the best substitutes for seedling trays. First of all, you probably already have some. If not, ask your neighbors for theirs. Therefore, this doesn’t cost anything.

Second, as Treehugger explains, these are biodegradable. Therefore, when you’re ready to move the seeds from the tray to the ground, all that you need to do is cut apart the egg carton and bury each section in the soil. In other words, you don’t have to take the seed out of the tray at all.

Furthermore, if you still have your egg shells, then you can include those as part of the planting process. Leave half an eggshell in each cup of the egg carton. Plant the seeds inside of those. You get great nutrients and don’t waste those eggshells.

2. DIY Newspaper Pots

Treehugger also notes that you can do the same thing with DIY newspaper pots. Make them yourself with recycled newspaper glued together with wheat paste. Plant the seeds in the pots. Then, when it’s time, plant the pots into the soil. You can put each pot next to another inside of a cardboard box while the seeds are germinating.

3. Cardboard Coffee Cups

If you regularly purchase coffee to go, then you might be able to quickly accrue a bunch of cardboard coffee cups. Ask your friends if you need extras. Fill them with soil, poke some holes in the bottom for good drainage, put them into an upcycled box, and you have a seedling tray.

Country Living points out that you can use empty K-cups in the same manner.

4. Toilet Paper Roll Tubes

Basically, any cardboard or paper that you can fashion into a pot-like vessel can work. Therefore, both Country Living and Treehugger mention the common hack of using paper towel or toilet paper tubes. You fold one end to keep the soil inside, fill it with soil and the seed, and place into an empty box. Note: there are several alternatives for folding over the one end. For example, wrap the whole thing in brown paper bags.

5. Halved Citrus Rinds

Here is the most interesting suggestion from Country Living. Take a lemon, lime, orange, or grapefruit and cut it in half. Juice it and enjoy the juice. Poke a few holes in the bottom for drainage. Then fill the center with soil and plant your seed in there. When it’s time to plant, just bury the whole thing in the soil in your garden.

Read More:


5 Cheap Ways to Self Water Plants

Cheap Ways to Self Water Plants

Some people love the ritual of watering their plants each day. However, many of us like to simplify our schedules by setting up systems whereby plants can self water. Moreover, there might be times when you need plants to water themselves, such as when you go on vacation. It’s good to know some cheap ways to self water plants. Here are five ideas.

1. Upside Down Wine Bottle

Instead of putting your next empty wine bottle into the recycling bin, use it as a self-water device for your indoor plants. The Garden Glove explains that you:

  • Rinse the wine bottle thoroughly.
  • Fill it with water.
  • Re-cork it or put the screw cap back on.
  • Drill a hole in the center of the cork / cap.
  • Turn the bottle upside down.
  • Press it several inches down into the soil as close to the center of the pot as you can get.

That’s all; it will self water over the next several days. This is a great tip especially if you’re going away for a long weekend and just want the plants to be properly watered while you’re gone.

2. Two Liter Soda Bottle

The Garden Glove also offers this option, which is one of the cheap ways to self water plants that are outside or indoors in larger containers. Here’s what you do:

  • Thoroughly rinse a 2 liter bottle.
  • Cut the bottom off of the bottle.
  • Punch holes randomly around the entire body of the bottle.
  • Dig a hole near the plant’s root system that’s big enough to complete cover the bottle.
  • Bury the bottle in this hole, with the neck side up. You should surround the entire bottle with soil except for the top of it.
  • Pour water into the top (which is the cut bottom, remember) until the vessel is full.
  • It will now self-water.

3. Bathtub Plants

If you’re looking for cheap ways to self water plants while you’re on vacation, consider putting them in the bathtub. ProFlowers explains:

  • Fill the bathtub with several inches of water.
  • Lay a towel down in the water.
  • Place plants, in their pots, on top of the towel in the water.

That’s it. The plants should soak up the water while you’re away.

4. String/ Rope Wicks

Many of the DIY methods of self watering use some variation on this. The idea is that you have a vessel of water near the plant. You insert string or rope into the water. The other end of the string or rope goes into the soil near the plant. The plant will then drink what it needs through the straw of the string.

5. Plastic Bag Bubble

ProFlowers also suggests this one. Here’s how it works:

  • Put wooden stacks in the corners of the plant’s container, tucked into the soil.
  • Water your plant as normal.
  • Wrap a plastic bag around the four stakes. The bag should be slightly bigger than the plant itself. It should not touch the plant’s leaves.
  • Move the plant so that it’s not in direct sunlight.

This should work like a tiny greenhouse.

Read More:


DIY Compost Using a 5 Gallon Bucket


DIY Compost Using a 5 Gallon Bucket

Compost is an essential medium for any gardener. It enriches the soil, provides nutrients to plants, and helps improve soil composition. It’s also easy to make compost using simple items you probably have lying around your home. Here’s how to make a 5-gallon bucket compost bin to get yourself some free compost.

Tools

I covered a similar topic earlier this year when I blogged about creating a low-cost worm compost bin. If you’re not a fan of worms and want to avoid dealing directly with creepy crawlies, here’s an alternative method for creating your own compost.

Often, people use storebought bins to compost produce scraps and yard refuse. You can also build a bin from scratch. If you’re not very handy and don’t have room for a full-size compost bin, you’re in luck! A bucket compost system works in a pinch and is great for people who garden on their balconies or porch.

What do you need?

  • A 5-gallon bucket. That’s pretty much it. If you don’t have one, you can probably grab one at your local hardware store for cheap. But ask around, someone you know might have one they don’t need.
  • A drill. This is to drill holes in the bucket. If you don’t have power tools, use a hammer and nail.

Assembling Your DIY Compost Bin

Take your 5-gallon compost bucket and drill holes in the bottom and the lid. You need to let the compost aerate to prevent mold growth.

Use something at the bottom of your bin to prevent the drainage holes from getting lodged with waste. You can use sticks, rocks, whatever works.

The next step? Filling up the bucket!

You can fill your 5-gallon DIY compost bucket with fruit and veggie scraps, grass clippings, and other compost-friendly materials. Not sure what you can put in? Here’s a handy guide.

It’s best to keep your bin outside to prevent odors from stinking up your home. Roll the bin around occasionally to ensure the materials mix together. If you choose to line the bottom of your bin with rocks, it may be tougher to mix the contents, though.

Always make sure the lid is tightly affixed to the bucket to keep pests from breaking in and feasting on your rotting materials.

How Long Will it Take?

It can take a while for matter in your compost bucket to decompose fully. The rate of decomposition depends on the weather, where you live, and what you stuff inside. Avoid filling the bin up too much. If there’s not enough air, it’ll take longer for stuff to break down.

Help your 5-gallon bucket compost bin contents along by putting your bin in a spot with lots of sunlight.

Need a visual guide to get your 5-gallon compost bucket ready? Check out this YouTube tutorial:


5 Free Garden Marker Ideas to Keep Track of Plants

free garden marker ideas

Why should you consider these free garden marker ideas? I don’t care how great your memory is, find a way to label all of your seedlings and transplanted crops—knowing what you’ve planted (and where) is equally important when you’re direct-sowing. If you forget to label the spot where you’ve just sown seeds, you might accidentally sow again in the same area. It’s a waste of time and seed. You might also mistake seedlings for weeds. An experienced gardener can usually tell the difference, but if you’re new to the hobby, you might end up pulling up precious starts thinking they’re garden invaders.

Labeling plants doesn’t have to be a difficult or costly ordeal. There are plenty of ways to label plants without spending a penny. Here are five free garden marker ideas for your outdoor oasis.

Free Garden Marker Ideas

Popsicle sticks

These are ultra-cheap, and you’ve likely got some stowed away in a cupboard somewhere. If you’re not an artsy type and don’t have a craft cupboard, try saving leftover popsicle sticks after devouring summer treats. All you need is a permanent marker to label each stick.

Masking tape 

I use this for indoor plants and seedlings when I’ve run out of the standard plastic plant markers. Just be careful not to get masking tape wet.

Stones

I don’t suggest creating permanent garden markers that cannot be moved. Markers should be easy to transfer to different areas of the garden. It’s best to rotate crops (even in a small garden!) and avoid planting them in the same spot year after year. Get creative and paint stones to mark your garden crops. They’re incredibly durable (duh!), and you can have fun with designing them. If you don’t have stones nearby, you can order a set on Amazon and get them delivered for free to your home.

amzn_assoc_placement = "adunit0"; amzn_assoc_tracking_id = "dimell-20"; amzn_assoc_ad_mode = "manual"; amzn_assoc_ad_type = "smart"; amzn_assoc_marketplace = "amazon"; amzn_assoc_region = "US"; amzn_assoc_asins = "B0143IX8W6,B07F2HCDL8"; amzn_assoc_linkid = "fd3fd3e2b4a42b345b18c8c5b083c4c9"; amzn_assoc_design = "in_content";

Recycled bottles

Have a bunch of leftover wine bottles? Don’t toss them in the recycling bin! Use them in the garden. Fill them with water and pop them next to thirsty plants or paint and label them to keep track of what you’re growing where.

Seed packets

Laminate and mount empty seed packets on wooden or metal sticks and enjoy a garden marker that contains all of the reference info you need to grow a particular plant.

Fall Cleanup

Even the most durable garden markers (e.g., stones) shouldn’t be left in the garden over the winter. Remember to bring everything in at the end of the season. Store your garden markers away from the harsh elements to keep them in tip-top shape year after year.

Need more ideas? Check out this video that contains a slew of ideas for creating garden markers for your outdoor growing space.

https://www.youtube.com/watch?v=BMTLvRsmEZc