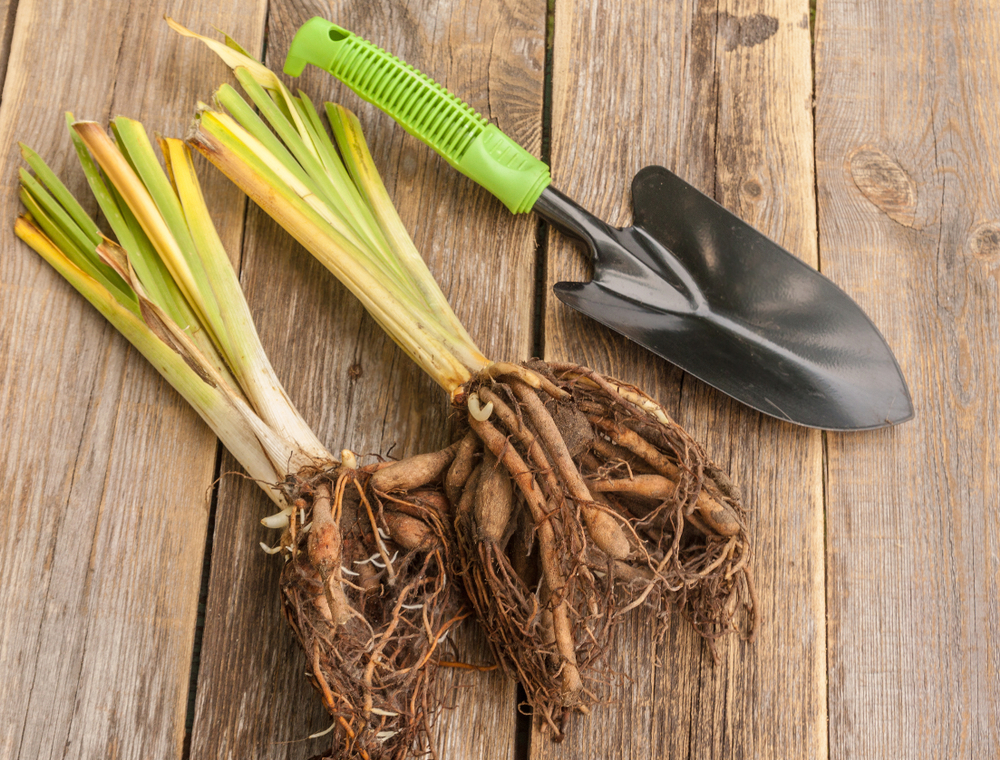
Daylilies have a way of quietly taking over a flower bed. A plant that once produced an attractive mound of foliage can eventually become a dense clump with fewer flowers in the center, signaling that it may be time for some attention. Dividing an established plant rejuvenates the planting while turning one daylily into several plants you can use elsewhere without spending another dollar at the garden center. Fall can be a good time for dividing daylilies, but timing matters because newly transplanted roots need an opportunity to become established before serious cold arrives. If your clumps have become crowded, here’s how to divide them without unnecessarily damaging the plants you’ve spent years growing.
Look for Signs Your Daylilies Actually Need Dividing
You don’t have to divide daylilies simply because another gardening season is ending. The University of Minnesota says these vigorous perennials can generally be divided every three to five years, and division can promote better flowering. An overcrowded clump may develop fewer flowers, smaller growth or an unproductive area near its center as plants compete for available resources. On the other hand, a relatively young daylily that is flowering vigorously and still has plenty of room may be perfectly happy left alone. The goal of dividing daylilies isn’t creating another fall chore—it’s improving plants that have actually become crowded.
Don’t Wait Until the Ground Is Nearly Frozen
Early fall can be an excellent transplanting window, but November isn’t interchangeable with September in a cold climate. Purdue University explains that late-summer or early-fall planting gives daylilies time to establish roots before cold weather, while spring planting is another acceptable option. In colder areas, gardeners should therefore avoid waiting until the soil is on the verge of freezing before tackling an established clump. If you’ve missed a reasonable fall establishment window, waiting until early spring may be safer than forcing freshly divided plants into freezing soil. Your local frost and freeze dates matter more than a universal calendar date because autumn conditions vary dramatically across the country.
Water Dry Soil Before Reaching for the Shovel
Trying to divide a perennial growing in hard, bone-dry soil creates unnecessary work for you and stress for the plant. The University of Minnesota recommends watering dry soil the day before dividing perennials and, when possible, doing the job on a cloudy day rather than during hot sunshine. Moist—not waterlogged—soil is easier to dig and usually releases roots with less wrestling. Before starting, prepare the new planting locations as well so divisions aren’t sitting exposed while you decide where to put them. With dividing daylilies, a little preparation can make the difference between a controlled gardening job and an afternoon spent fighting an enormous root ball.
Dig Up the Entire Clump Without Chopping Through It
Start with a spade or garden fork several inches outside the foliage rather than plunging the tool through the middle of the plant. Work around the perimeter, loosening the soil gradually until you can lift the entire root mass from the ground. Daylilies have substantial fleshy roots, so expect an old clump to be heavier and tougher than its grassy-looking foliage suggests. Shake away loose soil or gently remove enough soil that you can see where individual groups of fans connect. Taking the plant out intact first gives you much more control over the eventual divisions than randomly slicing pieces from a clump while it’s still buried.
Separate Healthy Fans Instead of Making Random Chunks
Once the roots are visible, you may be able to pull smaller groups of fans apart with your hands. Large, tightly packed plants sometimes require a clean, sharp knife or spade, and Iowa State University recommends giving each division two or three fans of foliage along with a healthy root system. Inspect the plant while you’re working and discard dead, weak or badly damaged material rather than replanting every piece simply because it has roots attached. For late-season divisions, Iowa State recommends cutting foliage back to approximately six to eight inches. Keeping manageable groups of healthy fans is usually a better strategy than trying to turn one mature plant into dozens of tiny divisions.
Don’t Bury the Crown Too Deeply
One of the easiest mistakes when dividing daylilies happens when the plants go back into the ground. The crown—the point where the foliage and roots meet—should sit approximately one inch below the soil surface, according to both Iowa State and University of Minnesota guidance. Purdue warns that planting too deeply can lead to foliage browning and poor vigor. Spread the roots naturally in the planting hole instead of cramming them into a narrow vertical space, then gently firm soil around them. If you can’t easily identify the crown, stop and find it before planting rather than assuming deeper automatically means better winter protection.
Water Thoroughly, but Skip the Fall Fertilizer Push
Fresh divisions need good soil contact and adequate moisture to establish new roots before winter. Water thoroughly immediately after planting and continue monitoring moisture if autumn turns unusually dry, rather than assuming cooler weather means the plants can’t dry out. North Carolina Cooperative specifically advises watering newly divided daylilies thoroughly while avoiding fertilizer during late-summer division. Pushing tender new top growth with unnecessary fertilizer as winter approaches isn’t the objective; establishing the roots is. A modest layer of mulch can help moderate soil temperatures, particularly around newly transplanted divisions, but don’t bury the crowns beneath a mountain of material.
Use Division as a Free Way to Expand the Garden
Perhaps the best part about dividing daylilies is realizing how much new landscaping material was hiding inside one crowded plant. A mature clump may produce several healthy divisions, allowing you to fill an empty border, repeat the same color elsewhere, or trade plants with another gardener.
Buying multiple established perennials can quickly become expensive, while division essentially converts the plants you already own into free garden inventory. Just remember that newly divided daylilies may not immediately deliver their best floral display; the University of Minnesota notes that spring-divided plants may not bloom that summer, while Iowa State says divisions may not bloom well for a year or two. Give the plants time to rebuild, and the long-term payoff can be a healthier and fuller garden without another nursery bill.
One Crowded Clump Can Become an Entire New Border
Fall dividing daylilies works best when you give the plants enough time to establish instead of treating frozen ground as your deadline. Dig carefully, preserve healthy roots, keep a few fans with each division and pay close attention to crown depth when replanting. Water the new plants well and protect vulnerable transplants with appropriate mulch as winter approaches. If conditions have already become too cold, there’s no prize for squeezing the job into autumn because daylilies can also be divided when growth resumes in spring.
Have your daylilies become overcrowded, and would you replant the extra divisions in your own garden or give them to someone else?
What to Read Next
Cold-Frame Crops That Can Stretch Your Growing Season
Leave a Reply