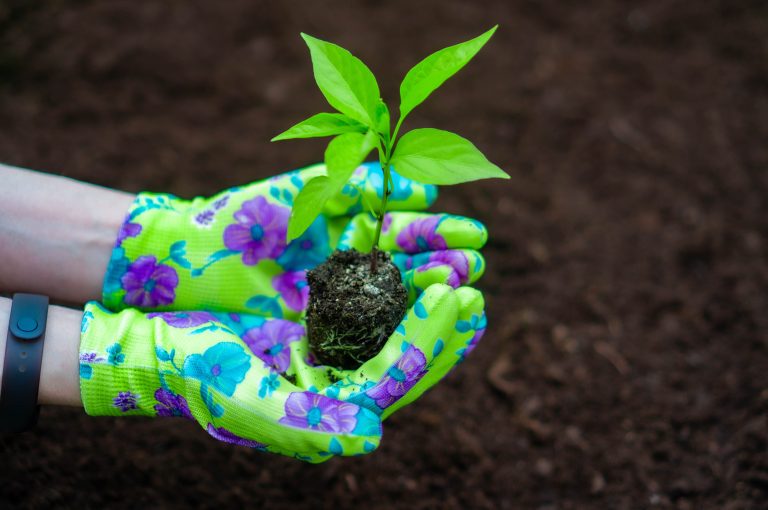
Does Transplanting Carrots Even Work?

Does Transplanting Carrots Even Work

Transplanting carrots is a topic of much debate among gardeners. Known for their finicky nature when it comes to root disturbance, carrots are typically sown directly into their final growing location. However, with the proper techniques and care, transplanting carrots successfully is possible. Here’s a dive into the nuances of transplanting carrot seedlings, including insights and tips to help gardeners navigate this challenging task.

Why Transplanting Carrots Is Challenging

Why Transplanting Carrots Is Challenging

Transplanting carrots is often considered difficult due to their sensitive taproot system, which is easily disturbed during the moving process. Many gardeners struggle with the challenge of keeping this central root intact, as any damage can lead to stunted growth or misshapen carrots. Additionally, the precise conditions required for successful transplanting, such as the need for loose, deep soil and careful handling, add to the complexity of the task. The narrow window for transplanting, when seedlings are young and their taproots undeveloped, also requires timely attention and can be easily missed. These factors combine to make carrot transplanting a task that demands patience, skill, and a gentle touch, deterring some from attempting it.

Is Transplanting Carrot Seedlings Possible?

Is Transplanting Carrot Seedlings Possible

Transplanting carrot seedlings is indeed possible, though it requires meticulous handling and precise conditions. Carrots, being root vegetables, are sensitive to any disturbance that affects their root growth. Traditional wisdom suggests that carrots do not transplant well because they can end up with forked or misshapen roots. However, with proper technique, young carrot seedlings can be successfully transplanted, allowing gardeners to optimize their garden space and extend growing seasons.

Choosing the Right Time to Transplant

Choosing the Right Time to Transplant

Timing is crucial when transplanting carrot seedlings. The best time is when they are very young, ideally with just one or two true leaves. At this stage, the carrot’s taproot has not yet fully developed, reducing the risk of significant damage. Transplanting during cooler parts of the day, like early morning or late afternoon, can help minimize transplant shock and give the seedlings a better chance to adapt to their new environment.

Preparing the Soil

Preparing the Soil

Carrots thrive in loose, well-draining soil that is free of stones and debris, which can cause the roots to fork. Before transplanting, prepare the garden bed by loosening the soil to a depth of at least 8-12 inches and incorporating organic matter to improve fertility and texture. Ensure the soil is moist but not drenched or soaking, as carrots need consistent moisture but cannot tolerate soggy conditions.

Creating a Thin, Straight Hole for Transplanting

Creating a Thin Straight Hole for Transplanting

When transplanting carrot seedlings, the creation of a thin, straight hole for each seedling is a critical step. Carrots need a clear, unobstructed path to grow deep into the soil, developing their characteristic long, straight roots. Using a dibber or a pencil, make holes in the prepared bed that are deep enough to accommodate the entire length of the seedling’s root without bending or curling. This precision ensures that the delicate taproot of the carrot seedling can extend directly downward, promoting healthy growth and preventing deformities.

Ensuring Proper Spacing

Ensuring Proper Spacing

Spacing is vital for the development of carrot roots. When transplanting, place seedlings at least 2-3 inches apart to give each carrot enough room to grow. This spacing helps prevent competition for nutrients and water and allows each carrot to develop a robust and straight root. Consider using a ruler or a spacing guide to achieve uniform spacing.

Watering After Transplanting

Watering After Transplanting

Immediately after transplanting, water the seedlings gently but thoroughly to settle the soil around the roots and eliminate air pockets. Maintain consistent soil moisture levels during the growing season, as fluctuations in water availability can lead to split or misshapen carrots. Mulching around the seedlings can help retain soil moisture and regulate soil temperature.

Monitoring for Pests and Diseases

Monitoring for Pests and Diseases

Keep a close eye on the transplanted seedlings for signs of pests or diseases, which can be more prevalent in stressed or weakened plants. Common carrot pests include carrot rust flies and aphids, while diseases like damping-off can affect young seedlings. Prompt action – such as removing affected plants or applying appropriate organic pest control measures – can help prevent the spread of disease and ensure the health of your carrot crop.

Protecting Carrots from Wild Animals

Protecting Carrots from Wild Animals

After transplanting, protecting carrot seedlings from wild animals is crucial for their survival and growth. Installing physical barriers such as fencing or netting around the garden bed can effectively deter larger animals like rabbits and deer. For smaller pests, such as rodents, using cloches or mesh covers directly over the seedlings can provide necessary protection without hindering their access to sunlight and rain.

You Can Transplant Carrots!

You Can Transplant Carrots!

While transplanting carrots poses its challenges, it is indeed possible and can be successful with careful planning and gentle handling. This outlined process not only maximizes garden space and extends the growing season but also offers the rewarding experience of nurturing these nutritious root vegetables from seedling to harvest.


When Should I Transplant Sunflower Seedlings?

When Should I Transplant Sunflower Seedlings

In the world of gardening, sunflowers stand tall as symbols of happiness and resilience, drawing both seasoned gardeners and beginners to their sun-seeking blooms. With the growing trend towards sustainable living and the joy of home gardening, understanding the nuances of growing sunflowers, particularly when to transplant sunflower seedlings, has never been more relevant. This article will guide you through each crucial step, ensuring your sunflowers flourish.

Growing Sunflowers from Seeds Indoors

Growing Sunflowers from Seeds Indoors

For some gardeners, starting their sunflower journey begins with planting seeds indoors. This method gives your sunflowers a head start, protecting them from early-season frosts and pests. Use quality seed-starting mix in pots or trays, placing the seeds about an inch deep. Sunflower seeds typically germinate within 7 to 10 days in warm conditions, so ensure they’re kept in a spot that receives plenty of light and warmth. Also, keep the light a bit low, as it helps the plants become more robust. By doing so, this controlled environment fosters strong, healthy seedlings, ready for the great outdoors when the time is right.

How to Tell If Sunflower Seedlings Are Ready for Transplant

How to Tell If Sunflower Seedlings Are Ready for Transplant

Sunflower seedlings announce their readiness for transplanting in a few key ways. First, look for the development of their second set of true leaves, a reliable indicator that they’ve outgrown their initial confines. Generally, you want at least four true leaves before moving forward. Additionally, a robust root system should start to fill the confines of their pots, signaling a need for more space. These milestones typically occur a few weeks after germination, depending on the growing conditions and sunflower variety.

Optimal Season and Weather Conditions for Transplanting Sunflower Seedlings

Optimal Season and Weather Conditions

The best time to transplant sunflower seedlings outdoors is after the last frost when the soil has warmed sufficiently. Sunflowers thrive in warm conditions and can be stunted or damaged by cold snaps. Ideal transplanting conditions include a mild, overcast day to prevent immediate sun exposure stress. This gentle introduction to the outdoor environment can significantly improve the seedlings’ chances of thriving once they’re planted outdoors.

Best Location to Transplant Sunflower Seedlings

Best Location to Transplant Sunflower Seedlings

Sunflowers are heliotropic in their early stages, meaning they follow the sun across the sky, so choosing a sunny spot is crucial. Select a location that receives at least 6-8 hours of direct sunlight daily. Sunflowers aren’t fussy about soil but prefer well-draining ground. Avoid spots prone to waterlogging or that remain in shadow for extended periods.

Preparing Sunflower Seedlings for Transplanting

Preparing Sunflower Seedlings for Transplanting

Preparation is key to a smooth transition. Begin by hardening off your seedlings, gradually acclimatizing them to outdoor conditions over a week. This process involves exposing them to outside temperatures and sunlight incrementally, reducing transplant shock. Ensure your garden bed is ready, too, with loose, fertile soil to welcome the young plants.

How to Transplant Sunflower Seedlings Correctly

How to Transplant Sunflower Seedlings Correctly

Transplanting day is crucial for your sunflower seedlings. Dig holes slightly larger than the seedlings’ root balls, spacing them according to the variety’s expected mature size. Gently remove the seedlings from their containers, trying not to disturb the roots unless they’re root-bound. If the roots are dense and tangled, gently loosen them. Then, place the seedlings in the holes. Finally, backfill with soil and water thoroughly to settle them in and eliminate air pockets.

Properly Spacing Sunflower Seedlings

Properly Spacing Sunflower Seedlings

Spacing is vital for sunflower seedlings to ensure they have enough room to thrive. Proper spacing prevents competition for nutrients and light, both of which are essential for healthy growth and maximum bloom size. Smaller varieties can be planted closer together, potentially as close as 6 inches apart. Taller sunflowers typically require at least 1 foot of space, while giant sunflowers need more room, so plant them about 2-3 feet apart.

Caring for Sunflower Seedlings After Transplanting

Caring for Sunflower Seedlings After Transplanting

Post-transplant care involves regular watering to keep the soil moist but not soggy, especially during dry spells. Mulching can help retain soil moisture and suppress weeds. Watch for pests and diseases, and support taller varieties with stakes to prevent them from toppling over in strong winds.

Successfully Transplanting Sunflowers

Successfully Transplanting Sunflowers

Transplanting sunflower seedlings at the right time and with proper care sets the foundation for a garden filled with these joyful blooms. By paying attention to the readiness of your seedlings, the optimal conditions for transplanting, and providing the care they need in their new environment, you’ll be rewarded with a stunning display of sunflowers. Whether for their beauty, the seeds they produce, or the joy of gardening, sunflowers bring light and life to any garden space.


How To Transplant Pepper Seedlings: A Step-By-Step Guide

How To Transplant Pepper Seedlings

Transplanting pepper seedlings is a critical step in the journey of growing peppers, whether you’re a hobbyist gardener or a commercial grower. The process can significantly impact the health, growth, and yield of your pepper plants. With the rising interest in home gardening and sustainable living, understanding when to transplant seedlings and the right way to transplant pepper seedlings has never been more relevant. This guide will walk you through the process step by step, ensuring your pepper plants thrive in their new environment.

When to Transplant Pepper Seedlings

When to Transplant Pepper Seedlings

Timing is everything when it comes to transplanting pepper seedlings. The ideal time is after the last frost when the soil has warmed up to at least 60°F (15°C), typically in late spring or early summer. Pepper plants are warm-season crops that thrive in warm temperatures, and transplanting them too early can stunt their growth or even be fatal.

Wait until your seedlings produce their third set of true leaves, which indicates they are strong enough to handle the transition. Usually, that occurs about 3 to 4 weeks after sprouting, though the exact timeline can vary. This timing also aligns with the growing interest in seasonal gardening, making it especially relevant for those looking to optimize their gardening efforts.

Preparing the New Home

Preparing the New Home

Before you transplant, it’s essential to prepare the new location, whether it’s in your garden bed or a larger container. Ensure the soil is rich in organic matter and well-draining to promote healthy root growth. Amend the soil with compost or a balanced, slow-release fertilizer to provide essential nutrients. The pH of the soil should ideally be between 6.0 and 6.8.

If you’re planting in containers, choose ones that are at least 12 inches deep to accommodate the pepper plants’ root system. This preparation is crucial for the plants’ success and aligns with the trend towards organic and sustainable gardening practices.

Acclimatizing Your Seedlings

Acclimatizing Your Seedlings

Acclimatization, or “hardening off,” is a process that gradually introduces indoor-grown seedlings to outdoor conditions. Over 7 to 10 days, start by placing your seedlings outside in a shaded, sheltered area for a few hours each day, gradually increasing their exposure to sunlight and outdoor temperatures. This step is vital for reducing transplant shock, a common issue that can stunt growth and affect the overall health of the plants. With the increasing popularity of starting seeds indoors, this step has become more relevant for gardeners looking to transition their plants outdoors successfully.

The Transplanting Process

The Transplanting Process

When it’s time to transplant, water your seedlings thoroughly a few hours before moving them; this makes the soil cling to the roots and reduces stress on the plant. Dig a hole in the prepared soil slightly larger than the seedling’s root ball. Gently remove the seedling from its current container, being careful not to damage the roots. Then, roll the root ball gently to loosen it up and ensure the pepper plant isn’t rootbound. After that, carefully place it in the hole.

The base of the stem should be level with the soil surface. Backfill the hole with soil and press lightly to remove air pockets, then water the seedling gently but thoroughly to help settle the soil around the roots. This process is crucial for ensuring a smooth transition and promoting strong root development.

Post-Transplant Care

Post-Transplant Care

After transplanting, it’s essential to provide your pepper plants with consistent care to ensure they thrive. Keep the soil evenly moist, but avoid overwatering, which can lead to root rot. Mulching around the base of the plants can help retain soil moisture and regulate temperature. Provide support with stakes or cages as the plants grow, especially for larger varieties that can become top-heavy with peppers.

Regular feeding with a balanced fertilizer can also promote healthy growth and fruit production. This ongoing care is essential for maximizing the yield and health of your pepper plants, reflecting the broader trend toward meticulous and informed gardening practices.

Congratulations! You’ve Transplant Pepper Seedlings Successfully!

Transplant Pepper Seedlings Successfully

Transplanting pepper seedlings successfully is a key step in growing healthy and productive plants. By following this step-by-step guide, gardeners can ensure their pepper plants are well-prepared to thrive in their new environment. The process, from choosing the right time to post-transplant care, reflects current trends in gardening towards sustainability, organic practices, and the joy of growing your food. With patience and attention to detail, you can enjoy a bountiful harvest of peppers from your garden.


4 Advantages of Pruning Plant Roots


4 Advantages of Pruning Plant Roots

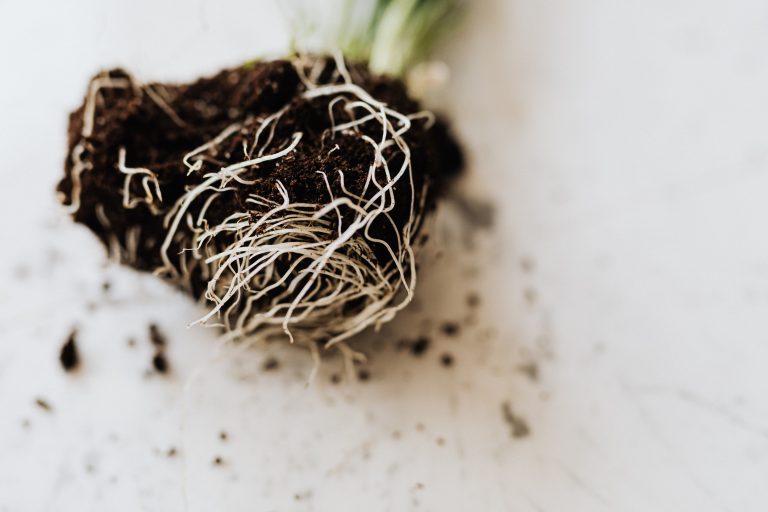
You’ve heard of pruning branches, but what about pruning plant roots? Roots aren’t something we think about very often. Mainly because they’re buried under the earth. Out of sight. Out of mind. However, paying attention to your plant’s roots can be an essential part of raising healthy houseplants. 

Here’s why you might consider pruning plant roots. Below, you’ll also find a helpful video for guidance on how to prune plant roots.

Improve root growth

Young plants can sometimes fail to produce healthy, abundant root systems. When this happens, pruning the roots before transplanting may help encourage more vigorous growth.

Prevent or reverse root binding

If you’ve ever repotted a plant or left a seedling too long in its pot, you may have noticed that its root system begins to circle the bottom of the container. If this happens, it means the plant has become root-bound. Without anywhere else to expand, the roots become a ragged, dense mess. Trimming the roots can help encourage new root growth and improve the overall health of your plant.

An alternative to trimming is to use breathable fabric pots. Obviously, this isn’t a great option for indoor plants. For outdoor plants, thought, fabric pots allow for air pruning. Because the fabric is breathable, it will enable the roots to breathe, preventing plants from becoming root-bound altogether.

Increases nutrient absorption

By pruning plant roots, you encourage nutrient absorption. The new root fibers help increase a plant’s nutrient uptake from the soil. If you have a root-bound plant, it can’t take up nutrients efficiently because it’s incapable of growing a lot of new, healthy roots.

Slows down growth

Abundant growth is great, but a plant that grows too rapidly will quickly need to be repotted again and again. By pruning roots, you slow down overall growth keeping the plant the right size for its current pot for a little while longer.

Get more plants

You’ll also need to prune roots if you want to divide plants. To divide plants, you’ll need to separate the roots, clip them, and trim them to encourage new growth.

How to prune

The ideal way to prune a plant is to lightly trim part of its root system. Taking off too much can have the opposite effect and potentially damage the plant.


Troubleshoot the Seed Starting Process


Troubleshoot the Seed Starting Process

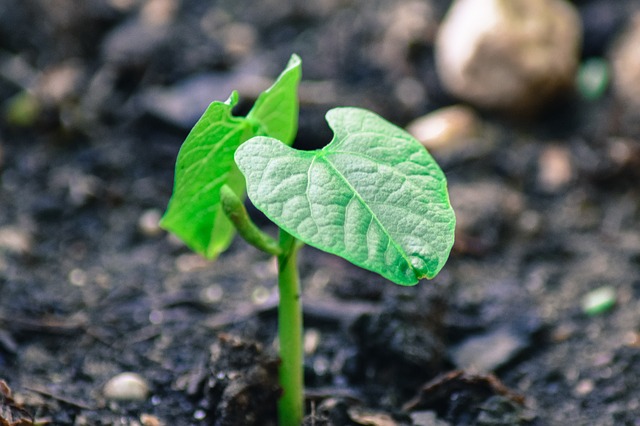
While every other region seems to be experiencing a thaw, it’s still mostly frozen here. My starts are happily enjoying their spots under the indoor lights and this weekend I’ll be starting another batch of plants like kale and Chinese broccoli. I happened upon a sale and purchased two additional plastic shelving units to hang a bunch of lights I had on hand. The extra space will give me plenty of room to repot tomatoes, peppers, and eggplants, and even start a few extras like flowers and herbs. So far, so good! But that doesn’t mean I never have to troubleshoot while seed starting.

Every gardener has run into problems at one point or another. Unfortunately, a lot of information out there doesn’t address the many things that could go wrong. Sometimes, even when you follow all the steps, your plants still die, pests still munch on all your greens, and seeds fail to germinate. I recently received a question that I thought would be worth answering here.

Troubleshoot the seed starting process

The beans I put in a couple of weeks ago haven’t germinated and have gotten moldy.  Are they going to germinate? 

The unfortunate answer is no. Bean seeds are notoriously quick to germinate, and their large size makes it easy to spot when that’s happening. Let’s troubleshoot the seed starting process. Here are a few reasons those seeds may have failed to germinate:

Inadequate moisture

Seeds need moisture to germinate. That doesn’t mean you should drown your soil in water. Too much water can lead to rot. This isn’t just an issue with seeds, many plants don’t do well when they’re drowning in water. Waterlogged soil can lead to root rot. Many new plant owners actually kill their indoor houseplants this way.

It’s too cold

Beans will sprout in soil that’s at least 60 degrees Fahrenheit (about 15 degrees Celcius). The ideal range is between 70 and 80 degrees, though. If you’re growing in a basement where it tends to get chilly, consider adding heating mats underneath your pots or plant trays. Sprouting seeds near a window? In the daytime, when exposed to sunlight your plants may be nice and toasty, but on cloudy days or during the evenings, the temperatures likely dip considerably. Although it may be tempting, NEVER use a space heater to keep your plants warm unless you’re in the room and supervising. Space heaters can lead to fires if left unattended.

It’s too hot

Certain seeds actually prefer cooler temperatures. Applying heat may be hindering the process. Seeds like lettuce and kale, for instance, might not germinate if conditions are too hot.

Seeds are too old

Properly preserved seeds can last a while in storage, but most folks simply fold down the packet and toss it wherever is convenient. If your seeds are over a year old and haven’t been stored in an airtight container, it’s possible they’re no longer viable. If you just purchased the seeds? It could be that you received a bad batch. You can try contacting the seed company to ask for a replacement. Buy from reputable companies to avoid getting bad-quality seeds.

Disease

Did you notice a small seedling only to return a day later and find the baby plant shriveled and dead? Damping-off occurs when seedlings are exposed to a fungal disease either through contaminated soil or unsanitary garden implements and accessories. Prevent this from happening by sanitizing your seed trays, pots, and tools every year. Purchase a sterile seed starting mix from a reputable company.

It’s ok to ignore algae

If you’re working with a hydroponic setup, you may notice algae build-up on your soil pods. It’s a bit unsightly but it’s anything to worry about. If it bothers you, you can cover the pods with tin foil to prevent algae growth.

A note about mold

Are you wondering what’s with all the mold? If you’re noticing a fuzzy white substance covering your freshly soil-filled pots or trays, it’s a sign that you’re overwatering your seedlings or that your growing area isn’t properly ventilated. Placing a fan in your growing space will help strengthen seedlings and keep air circulating. Watering from below may also help reduce the risk of mold growth.

A specific tip for growing beans

Don’t bother starting them indoors. Wait until all chance of frost has passed and direct sow seeds outside. Why? Beans don’t respond well to the transplanting process. You’ll have healthier bean plants if you sow outdoors.

I like to plants a few different bean varieties that mature at different times, so I always have a steady stream of beans to harvest for my dinner plate. Beans are pretty easy to grow, and they’re really fun to harvest. Finding ready-to-eat pods among the foliage is like a gardening treasure hunt!

Other seeds that prefer to be direct-seeded:

  • carrots
  • radishes
  • rutabaga
  • beets
  • parsnip
  • parsley

Something all these have in common is that they have a large taproot. Transplanting tends to disturb the taproot and can stress the plant to the point of no return. It doesn’t mean you can’t start these indoors ever, but chances are higher that your plants will become stressed during transplanting.


Hardening Off Plants Headache-Free

Hardening off plants

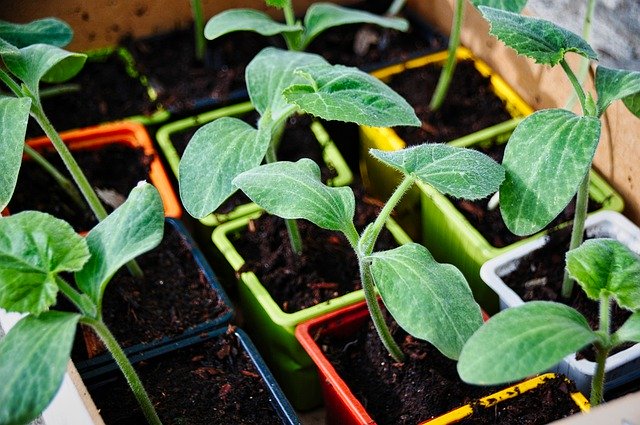
Hardening off plants is one of my least favorite gardening tasks. It requires a lot of care and attention, and it’s really easy to mess it up. I’ve yet to perfect the shuffle that involves bringing trays of seedling outside then back in. There’s always something that goes wrong. So let me help you avoid mistakes of your own by sharing all of mine, past, and present. 

What is hardening off?

Hardening off plants involves acclimating your indoor-grown seedlings to the outdoor climate and conditions. Inside your house, your baby plants are given plenty of tender, love, and care. If you don’t take the time to harden off your seedlings here’s what can happen:

  • Seedlings die because it’s too cold. 
  • Seedlings experience leaf burn because the sun is a whole lot stronger than any indoor lights your plant has previously been exposed to.
  • Seedlings die or become sickly because of transplant shock.
  • Seedlings topple over and stems break because it’s windy. 

How do I harden off my seedlings?

First, you should have an idea of when it’s appropriate to transplant your seedlings. Peppers and eggplants won’t be heading outside anytime soon in my climate because it’s still way too cold at night. 

Hardening off plants involves exposing them, little by little to outdoor temperatures, and, of course, the strong rays of the sun. In my experience, it takes a little over a week to complete the process because not every day looks the same weather-wise. Today, for instance, I didn’t bother putting my transplants outside for their second day of hardening off because the weather is stormy. I didn’t want to risk harming my tender starts.

Here’s a handy guide for hardening off seedlings

  • Day 1: Set out in the shade for 1-2 hours. Make sure the plants aren’t exposed to direct sunlight on their first day out in the wild.
  • Day 2: Increase outdoor plant time slightly, keeping them in shade.
  • Day 3: Increase time outdoors again with a little bit of time in the sun—make sure they’re not exposed to the sun at the hottest part of the day. They’re still not ready for that.
  • Day 4 and 5: Increase time outside in shade and sun incrementally. 
  • Day 6 to 7: Keep plants outside almost all day but bring them in at night.

Once that week of hardening off is complete, it’s time to transplant your starts in the garden. 

Errors to Avoid

There’s a lot of juggling around when hardening off plants. Set yourself a timer, so you don’t forget to bring plants inside, especially in the first few days. It’s easy to accidentally leave a tray of seedlings out in the hot afternoon sun and oops! You have a tray of burned plants on your hands. 

Don’t forget to water your plants! And if it rains, watch that your plants don’t stay sitting in a puddle of water all day. Drain the trays accordingly. 

Check the forecast, too. You don’t need to stick to a strict hardening off schedule. Adjust if you need to. Will it be unexpectedly chilly tomorrow? Don’t set out heat-loving starts until a day later when the warmth has returned.