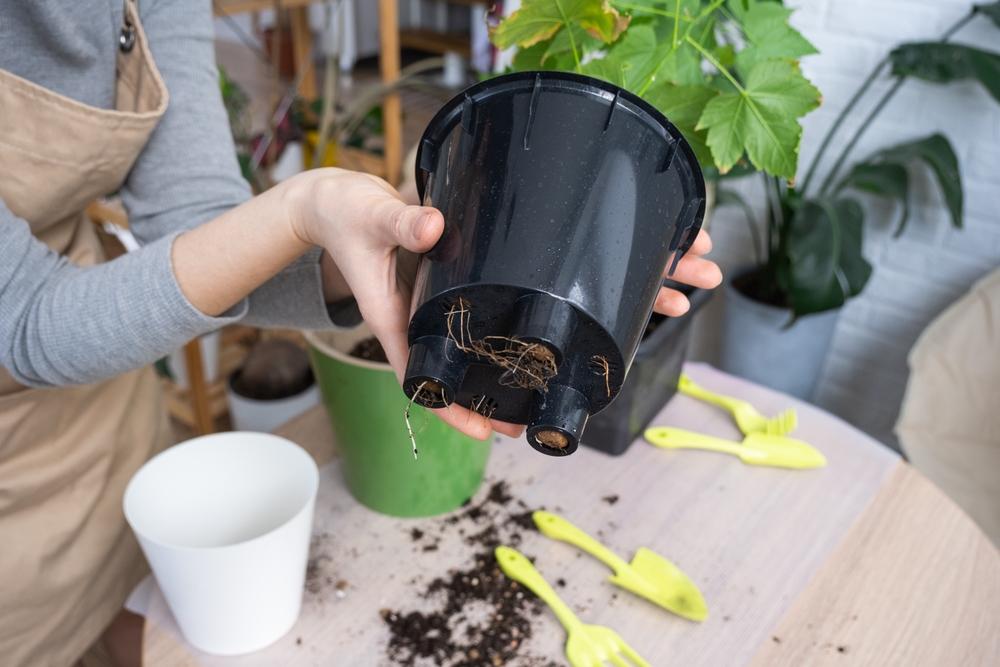
Bringing houseplants indoors before cold weather sounds simple enough: pick up the pot, carry it inside, and find a sunny window. But before that planter crosses the threshold, flip it over and inspect an area that’s easy to forget—the plant drainage holes. Months outdoors can leave pots harboring insects, roots, debris, and other surprises around their bases, while clogged or inadequate drainage can become a much bigger problem once plants are living indoors. The University of Minnesota recommends inspecting returning houseplants for insects and disease because fungus gnats, aphids, spider mites, mealybugs, scale, and even ordinary spiders can hitch a ride inside. Five minutes of inspection now could prevent weeks of chasing pests around your windowsills this winter.
Start by Turning the Pot Over
Most gardeners carefully inspect leaves before bringing plants indoors, but don’t stop at the foliage. Look beneath the container, around the rim, underneath saucers, and especially around the plant drainage holes, where roots and debris can create protected spaces.
Wash the outside of pots before moving them indoors to remove dirt and unwanted pests. If the planter has spent summer directly on soil, mulch, a deck, or a patio, inspect every crevice rather than giving the bottom a quick glance. Wear gloves, move slowly, and clean the container outside so anything you uncover stays outside too.
Make Sure Water Can Actually Get Out
Drainage holes aren’t merely convenient openings for excess water; they’re an important part of keeping roots healthy. Penn State explains that containers need drainage holes so excess water can escape instead of leaving potting mix waterlogged and increasing the risk of disease. Outdoors, heat, wind, and stronger sunlight may dry a container surprisingly quickly, masking drainage problems that become obvious once the plant moves into a cooler, lower-light house. Check whether roots, compacted potting mix, mineral buildup, or debris have obstructed the openings, and correct the problem without damaging major roots unnecessarily. If a decorative container has no plant drainage holes at all, consider using it as a cachepot with a properly draining nursery pot inside rather than planting directly into it.
Fungus Gnats Love the Conditions Poor Drainage Creates
A blocked drainage hole can cause another indoor annoyance: fungus gnats. Overwatering and poor drainage can contribute to root rot while encouraging fungus gnats and other pest problems. Adult fungus gnats are those tiny dark flies you may notice hovering around pots, while their larvae develop in moist growing media rich in organic material. Allow soil to dry between waterings as part of fungus-gnat management because consistently wet soil favors them. Ensuring that plant drainage holes are functioning won’t solve every gnat problem by itself, but it eliminates one condition that can keep the potting mix unnecessarily soggy.
Roots Coming Out the Bottom Tell You Something, Too
Finding roots protruding from drainage holes isn’t automatically a disaster, but it can be a useful clue about what’s happening inside the pot. Roots growing through drainage holes is one sign that a houseplant may need repotting.
Don’t automatically jump from a six-inch pot to a giant container, however, because too much extra potting mix can retain excessive moisture and create its own root problems. Minnesota Extension recommends moving up only one pot size when repotting, while other guidance suggests increasing the diameter by no more than roughly two to three inches. If the roots look healthy and the plant isn’t severely crowded, you may not need to turn your fall pest inspection into an unnecessary major transplant.
Give the Whole Plant a Pest Inspection
Once the bottom of the container passes inspection, work your way upward. Check stems, leaf joints, growing tips, and both sides of the leaves for aphids, whiteflies, mealybugs, scale, spider mites, webbing, sticky residue, eggs, or unexplained discoloration.
Outdoor pests can rapidly increase and spread to other plants after being brought indoors. A strong spray of water can dislodge some pests, while any pesticide or insecticidal product should be labeled for both the specific plant and intended use. Treating one plant outdoors is far easier than discovering several weeks later that pests have spread through every houseplant in the room.
Quarantine Returning Plants Instead of Grouping Them Immediately
Even a careful inspection can miss tiny insects, eggs, or early signs of disease. That’s why keeping returning plants separated from other indoor plants for two to three weeks to reduce the risk of spreading pests and disease. A spare room, isolated window, or other bright location away from your established collection can work, depending on the plant’s light requirements. Check the leaves, soil surface, pot exterior, and plant drainage holes again during regular watering because a problem that was invisible outdoors may become obvious later. Think of quarantine as cheap garden insurance: it costs virtually nothing but can protect plants you’ve spent years growing.
Change Your Watering Routine Once the Plants Come Inside
One of the easiest fall mistakes is continuing to water plants on the same schedule you used outdoors. Indoor conditions usually mean less intense light, less wind, and often slower growth, so soil may remain moist considerably longer. Do your best to check the potting medium before watering and allow excess water to leave through the drainage holes, then empty the water left in the saucer after about 30 minutes. Don’t let the pot sit continuously in drained water, since that defeats much of the benefit of having functional drainage in the first place. Let the plant and soil tell you when water is needed instead of automatically watering every Saturday because that’s what you did all summer.
One Quick Flip Can Prevent a Winter of Plant Problems
Fall plant migration isn’t just about beating the first cold night; it’s an opportunity to inspect every container before it enters your home. Clean the pot, verify that the plant drainage holes work, inspect for pests, remove dead material, and decide whether the plant actually needs repotting. Once inside, keep returning plants separate from your established collection for a couple of weeks and adjust watering for lower-light indoor conditions. These steps require little more than some water, a few minutes of your time, and possibly fresh potting mix, making them far cheaper than replacing plants after root rot or battling an indoor pest infestation.
What’s the strangest thing you’ve ever found hiding under an outdoor flowerpot when you picked it up for winter? Share your story in the comments.
What to Read Next
Before Bringing Potted Herbs Inside, Do This First
The HOA Approved His Garden — Then a New Board Fined Him $750 for It
Can You Really Grow Free Plants From Grocery Store Produce? Here’s What’s Worth Trying
Leave a Reply